LiveWhale: calendaring and content for higher education
Calendaring and content management built for higher education
LiveWhale is a unique platform designed to help colleges and universities communicate better, with unparalleled ease of use and community content sharing. It’s content management for storytellers.
LiveWhale is the platform behind LiveWhale Calendar, a best-in-class calendaring product for colleges and universities.
LiveWhale is a product of White Whale: a design, strategy, and technology firm that’s been working with schools like yours for almost two decades.
We understand colleges, and we know that your community of staff, faculty, and students is key to a successful website. With LiveWhale you can create news, events, images, faculty and student profiles, and more— and make them available throughout your institution. And if you don’t have the time to keep a lot of content up to date (imagine that!), it’s easy to find and add content from other groups on campus.
One-click editing means users can change content right on the page. Go to your page, click Edit Page, make your changes, click Save. Training’s over!
News, events, profiles, forms, blogs, files & whatever you need to drive your site, we’ve got you covered.
Every facet of the LiveWhale experience is customizable, from adding custom fields or changing instruction text to coding brand-new features just for your school. Our profiles module lets you create any number of content types to cover whatever your institution needs.
LiveWhale comes bundled with LiveWhale Calendar, the best and most flexible calendaring solution, purpose-build for higher education.
Tell the story of your school in the way that’s most authentic to you. LiveWhale’s robust and flexible theming system supports any visuals you can dream up, without sacrificing ease of editing.
Our interfaces are WCAG 2.0 and Section 508 compliant out of the box, and we do everything we can to help you make your content accessible to all, from captions to keyboard actions and beyond.
…and a lot more:
In-context page editing
Versioning
User roles and permissions
Accessibility checker
Website search
Custom maps
Galleries
Shared assets library
Forms with spam prevention
Social media integration
Emergency notifications
Embedded video
Event management and RSVPs
Custom content types
Widgets
Tag management
Page notes
SEO friendly
Automated backups
Image optimization
Template permissions
Multi-site management
Backend customization
Secure SSO authentication
AWS cloud hosting
LiveWhale API
Developer community
Building a better .edu
The developers who work with LiveWhale on campuses around the world are a true community, not a faceless crowd. We work closely with our clients to continuously improve our codebase. 50% of new features come directly from client requests.
Since all our clients are on the same version, the improvements we make to our codebase can be shared with everyone. That’s why upgrades to LiveWhale are always free.
The same goes for tech support. If you’re having a hard time using our system, that’s our problem too, and we want to hear about it. So every LiveWhale account comes with unlimited e-mail tech support.
Yes! We have secure, robust hosting fine-tuned for LiveWhale that we offer through Amazon Web Services. It’s highly-available with a 99.9% uptime guarantee, redundant, and includes nightly backups just in case. Let us worry about server updates, security packages, and the rest so you can focus on making your site awesome.
Yes! We’ll help you set up single-sign-on for LiveWhale so none of your users need to remember a separate password. You can also use this connection to do neat things like allow all faculty to edit their own profiles, or make certain pages/sections of your site available only to members of your college community.
Absolutely — and our small-but-mighty developer community uses it for all sorts of things. Whether you need an RSS, iCAL, or JSON feed of particular LiveWhale data or you want to build your own custom LiveWhale integration, we’ve got the tools and the skills to help.
A whole bunch of ways! To name a few… LiveWhale automatically generates robots.txt and sitemaps to feed search engines the latest content. Our page URLs (path/to/my/page) and dynamic content URLs (/live/news/123-title-of-news-story) are SEO-friendly out of the box. And, we auto-generate metatags (including Open Graph and JSON-LD tags) for all of your content automatically.
Yes — using the built-in Profiles tool you can easily add new types with custom fields for course listings, buildings on campus, special programs, or whatever else you need.
Our clients love using our software. Our business is making your (work) lives easier.
Adams State University
Adelphi University
Angelo State University
Arkansas State University
Barcelona School of Economics
Beloit College
Berea College
Brown University
Bucknell University
Carnegie Mellon University
Carondelet High School
Carthage College
Century College
Clarkson University
Clemson University
Colby College
College of the Atlantic
Colorado School of Mines
Connecticut College
Connecticut State Community Colleges
Cornell University College of Business
Dalhousie University
Eastern Florida State College
Emory & Henry College
Florida Institute of Technology
Georgetown University
Greenville Technical College
Grinnell College
Indiana University
Lewis & Clark College
Longwood University
Macalester College
Marymount Manhattan College
Menlo School
Middlesex College
Monmouth College
Mt Royal University
Mt. San Antonio College
New York Institute of Technology
New York University
NYU Abu Dhabi
NYU Shanghai
Oakland University
Portland Community College
Quinnipiac University
Radford University
Rice University
Saint Leo University
San Mateo Community College District
Santa Clara University
Santa Rosa Junior College
Seton Hall University
Simon Fraser University
Soka University of America
Southeastern Louisiana University
Southern Connecticut State University
Southwest Minnesota State University
Southwestern University
SUNY Brockport
SUNY Niagara
SUNY Purchase
Sweet Briar College
Syracuse Architecture
Tarleton State University
Temple University Beasley School of Law
Texas A&M University
Texas A&M, Corpus Christi
Trinity College
Tulsa Community College
University of Akron
University of Arkansas Medical Sciences
University of Calgary
University of California Berkeley
University of California Merced
University of Central Oklahoma
University of Chicago
University of Cincinnati
University of Connecticut
University of Florida
University of Houston
University of Louisiana, Lafayette
University of Louisiana, Monroe
University of Melbourne
University of Minnesota, Duluth
University of Minnesota, Twin Cities
University of Missouri
University of Missouri, Kansas City
University of Oklahoma
University of Pennsylvania Carey Law School
University of Pennsylvania Perelman School of Medicine
University of Pennsylvania School of Nursing
University of Southern Indiana
University of Texas at Austin, McCombs School of Business
University of Victoria
University of Wisconsin, Eau Claire
University of Wisconsin, Whitewater
Ursinus College
Vanderbilt University
Villanova University
Wesleyan University
Western Oregon University
York University, Schulich School of Business
We Have Your Back
We’re a responsive, efficient, enthusiastic team of creative problem solvers working from home offices in Oregon, California, New York, Nevada, Michigan, and Florida.
Isaac McGowan
Senior Developer
Isaac writes front-end code for the LiveWhale CMS, assists with other CMS implementations, and backs up our UI development team. He has developed and managed web applications since 1999, working on corporate teams as well as individually. Isaac lives in San Rafael with his wife and sons; his non-code interests include surfing, capoeira, and burritos.
Cindy Yueh
Web Developer
As a former tutor, Cindy has found a perfect combination of her love of teaching and web development in White Whale. She leads the theming and implementation process for new LiveWhale Calendar clients, and assists with testing and accessibility compliance. Outside of work, Cindy enjoys all sports, gaming, building mechanical keyboards, and going on long walks with her sister’s two dogs – Boba and Mango.
Tonya Langford Moyle
Vice President
On top of managing White Whale’s business affairs, Tonya works with clients on top-level branding and communications strategy – helping them get past organizational roadblocks and find ways to present web content to make sense to their multiple audiences. Raised in small-town Wisconsin, she headed east to attend Wellesley and then Brown, and then west to Portland, OR where she juggles work, kids, chickens, and a side-gig making napkins for her sister’s restaurant.
Katie Keaton
Project Manager
A compulsive list maker and professional organizer, it’s Katie’s job to shepherd projects from start to finish. She makes sure everything is on track, on budget, and everyone is happy. She holds a Bachelor’s from Alma College and a Master’s from Michigan State University. In her free time, you can find Katie with a camera around her neck or enjoying the outdoors with her dog.
Rachael Wilbur
Support Manager
Rachael has a wide range of knowledge and background experiences from working in the fine art, media, and higher education professions. She brings together all her strengths and translates them directly into helping with clients. Born and raised in the midwest, Rachael now calls the Blue Ridge Mountains her home—where she will make any excuse to go explore. She is a mother, photographer, avid recipe tester, and a former barista champion.
Jason Pontius
President
A pathological multitasker, Jason is involved in every aspect of the website development process – from collaborating with our senior designer on design work to overseeing the care and feeding of the LiveWhale CMS. Jason first began exploring interactive design in 1997 as a complement to his graduate study in linguistics at the University of Chicago (where he holds a master’s degree).
Karl Hinze
Director of Product
Karl is all about bringing people together to make beautiful things. Besides being a designer and programmer in his own right, Karl also has extensive experience in higher ed as a student, faculty, and staff member. Outside of White Whale, Karl is a musical theatre composer, where he continues to feed his love of collaboration, art, and storytelling.
Alex Romanovich
Technical Director
Alex has been indispensable to White Whale since its inception, becoming a permanent full-time employee in 2004 and taking the lead in the development of LiveWhale, our content management system. He is a graduate of NYU’s film and psychology programs, an active writer and photographer, and a student of metaphysics.
Get In Touch
Using LiveWhale Calendar
An introduction to LWC for calendar users, from the basics (like creating and managing events) to the not-quite-as-basics (like adding other event feeds to your calendars).
Getting oriented
A tour for the community of the general LWC interface, mainly focusing on the links in the top toolbar and toolbox dropdowns as well as basics like logging in.
Logging in
The login page for LiveWhale Calendar is almost always the URL of your calendar site plus /livewhale/. So if your calendar is located at calendar.yoursite.edu, you can log into LiveWhale at calendar.yoursite.edu/livewhale. Your calendar page may include a custom login link, in the footer or elsewhere.
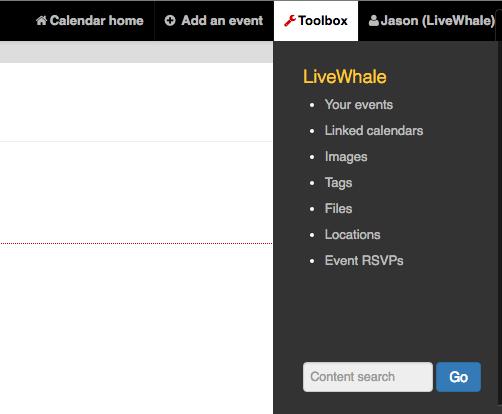
The LWC toolbar
The LiveWhale Calendar toolbar is your gateway to all LWC’s functions. The “Toolbox” section contains most of these links; here’s what it looks like for a typical calendar user.
Left side links These links are available to most LWC users. The header is your group name (ours is “LiveWhale” in the above screenshot). Most of the topics listed here are covered below on this page.
Changing user settings
To change your password (when you’re using LWC’s built-in authentication model), email address, or notification preferences, click the “User settings” link in the user menu at top left. There are some optional developer settings here as well.
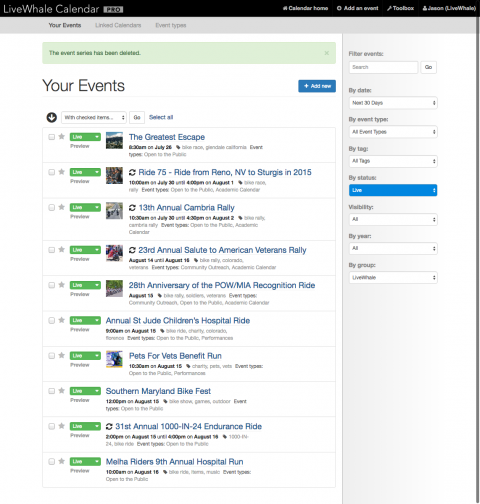
Events List
Your Events List is the best way to see all your events at once. You can edit events, filter events by tag, date, or other criteria, and set options for several events at once.
Event display
Here’s a look at the Events List. We’ll discuss specific sections in more detail below.
Add a new event using the blue button at top.
The right side panel allows you to filter events by a wide range of criteria to find the events you want.
The main events list lets you make changes in bulk using the checkbox at left (see below); add stars to events, and change their status from Live to Hidden; and see a variety of info about each event. Tap the event title to edit it.
Managing events in bulk
To make changes to several events at once— apply a tag or event type, add or remove stars, etc.— check several events and use the “With checked items…” dropdown to select an action.
Filtering events
Using the right side filtering options to locate the event(s) you want to edit.
The various options, including a keyword search, should make it easy for you to locate any upcoming or past event.
Creating events
Here’s the Add (or Edit) Event page. There’s a lot to it, so we’ll discuss it section by section.
The basics
Top:
Enter the event’s title in the “Enter a title for this event” space, and a short summary if appropriate below.
Tap the “Add/change images“ square [+] to add a photo to your event, or simply drag an image from your computer onto that square.
Left column:
Tapping the “Featured event” star marks your event as featured, and may be shown in “upcoming featured event” lists.
Tapping the globe marks your event as shared (see Community Features for more details).
Date is a required field, of course; time is optional. (Check “All Day” for events that are in fact all-day events.) You may set an ending date and/or time by tapping the appropriate checkbox. There are repeating options for daily, weekly, monthly, and yearly events, with a range of options for getting more specific.
Locations are discussed in more detail below.
Right column:
Events may be posted as Live or Hidden; Hidden events are never shown on public calendars, and are thus useful for events you’re working on but aren’t ready to promote yet.
Select the event types that are appropriate for your event. This list is the same for all calendar users; make sure to check “Open to the Public” for events you do want to promote outside campus.
Tags are descriptive keywords that help categorize your event. Tags are often used with event widgets— to create a list for a specific subset of your events— so you should think of tags as an additional organizing tool for your calendar.
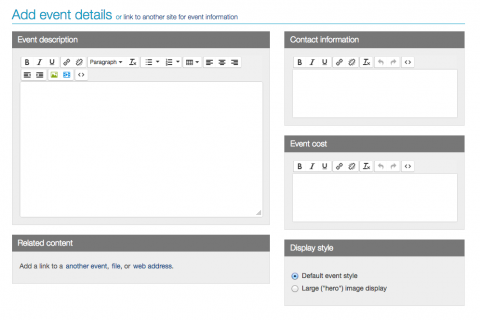
Event details
Top:
In lieu of an event description, you can choose to link to another site for event information. If selected, the link on your calendar or event widget will lead not to a calendar details view, but to this link instead.
Left column:
Enter an event description of any length. A number of text formatting tools are available, and you can add images and video to the event description as well.
Related content is a great way to give an event more context. You can link to a webpage (say, the resume or portfolio page of a featured speaker) or to one of your other events. You may also attach files (see below).
Right column:
Contact information is optional but definitely useful for people wanting more information about your events. If you always use the same contact info on your events, default contact info can be stored in your group settings (your calendar administrator can add that).
Event cost is an open-ended text field. (For schools with online payment integration, that information is located in the RSVP section below.)
Display style lets you choose between two views of your event: one with a large cover image, and the other with just a simple image view (or gallery, if multiple images are attached).
Event with hero image
Event default view
RSVP
Sharing and Privacy
For more information about suggesting events to other groups, see Community Features.
Note: This is a separate feature from the Live/Hidden selector; an event can be both “visible by everyone” and also Hidden; these options don’t affect each other.
Privacy options affect who can see your events at all. By default your events can be seen by any calendar visitor, but you can also limit visibility to any user logged in via your SSO (green icon), or any logged-in user in your specific calendar group (red icon).
Canceling events
You can cancel an event if you want it to keep displaying on the calendar; if you don’t want it to be on the calendar at all, you can simply delete it.
Cancel an event by tapping either the Cancel Event button at the top of the page, or the “This event is canceled” checkbox at the bottom. This will add “Canceled: ” to the beginning of the event title.
Working with images and files
Although most of the time you’ll probably add images to your events directly when creating them, you can also manage your image library directly. And files—essentially anything downloadable, but usually PDF files— can be a great way to include more information with your events without turning your event description into a wall of text.
Images
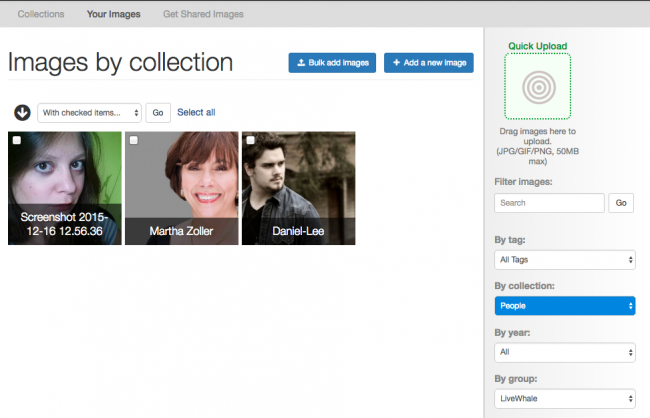
The Images library (which is linked in your toolbox) contains all the images you’ve posted to your events.
Collections Your images are organized by default into “collections.” Any images you’ve uploaded directly into events go into the “All Images” collection, but you can create new collections to organize them after the fact. And when uploading images, you can organize them into collections as well; this is very useful when uploading event photos, for example.
When viewing the images in a collection, you can filter them by tag, collection, year, or (if you’re an administrator) group. The “Quick Upload” target lets you drag images directly from your desktop into the image manager.
When editing an image, you can manage caption, credit, and other fields to help you organize and present images. You can also replace the image from here— if you need to replace an old image with a new one, just click that “Replace this with a new file from your computer” button, choose a new image, and your image will be updated sitewide automatically.
Files
Just about any file you can download can be attached to an event; PDFs and Word documents are the most common, but other file types are OK too. Files have fewer customizable options than images, but for the most part work just the same.
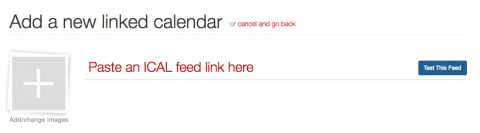
Adding linked calendars
One of LiveWhale Calendar’s most powerful features is its ability to add all the calendars you already use. Events from your other calendars— no matter the source— sync automatically and invisibly with LiveWhale Calendar, and are integrated seamlessly with the other events on your calendar.
Basics of adding calendars
A linked calendar usually begins with an ICAL feed. Most calendar products offer links to ICAL feeds; if you need to incorporate a calendar that doesn’t, contact our support team.
LiveWhale: calendaring and content for higher education
Calendaring and content management built for higher education
LiveWhale is a unique platform designed to help colleges and universities communicate better, with unparalleled ease of use and community content sharing. It’s content management for storytellers.
LiveWhale is the platform behind LiveWhale Calendar, a best-in-class calendaring product for colleges and universities.
LiveWhale is a product of White Whale: a design, strategy, and technology firm that’s been working with schools like yours for almost two decades.
We understand colleges, and we know that your community of staff, faculty, and students is key to a successful website. With LiveWhale you can create news, events, images, faculty and student profiles, and more— and make them available throughout your institution. And if you don’t have the time to keep a lot of content up to date (imagine that!), it’s easy to find and add content from other groups on campus.
One-click editing means users can change content right on the page. Go to your page, click Edit Page, make your changes, click Save. Training’s over!
News, events, profiles, forms, blogs, files & whatever you need to drive your site, we’ve got you covered.
Every facet of the LiveWhale experience is customizable, from adding custom fields or changing instruction text to coding brand-new features just for your school. Our profiles module lets you create any number of content types to cover whatever your institution needs.
LiveWhale comes bundled with LiveWhale Calendar, the best and most flexible calendaring solution, purpose-build for higher education.
Tell the story of your school in the way that’s most authentic to you. LiveWhale’s robust and flexible theming system supports any visuals you can dream up, without sacrificing ease of editing.
Our interfaces are WCAG 2.0 and Section 508 compliant out of the box, and we do everything we can to help you make your content accessible to all, from captions to keyboard actions and beyond.
…and a lot more:
In-context page editing
Versioning
User roles and permissions
Accessibility checker
Website search
Custom maps
Galleries
Shared assets library
Forms with spam prevention
Social media integration
Emergency notifications
Embedded video
Event management and RSVPs
Custom content types
Widgets
Tag management
Page notes
SEO friendly
Automated backups
Image optimization
Template permissions
Multi-site management
Backend customization
Secure SSO authentication
AWS cloud hosting
LiveWhale API
Developer community
Building a better .edu
The developers who work with LiveWhale on campuses around the world are a true community, not a faceless crowd. We work closely with our clients to continuously improve our codebase. 50% of new features come directly from client requests.
Since all our clients are on the same version, the improvements we make to our codebase can be shared with everyone. That’s why upgrades to LiveWhale are always free.
The same goes for tech support. If you’re having a hard time using our system, that’s our problem too, and we want to hear about it. So every LiveWhale account comes with unlimited e-mail tech support.
Yes! We have secure, robust hosting fine-tuned for LiveWhale that we offer through Amazon Web Services. It’s highly-available with a 99.9% uptime guarantee, redundant, and includes nightly backups just in case. Let us worry about server updates, security packages, and the rest so you can focus on making your site awesome.
Yes! We’ll help you set up single-sign-on for LiveWhale so none of your users need to remember a separate password. You can also use this connection to do neat things like allow all faculty to edit their own profiles, or make certain pages/sections of your site available only to members of your college community.
Absolutely — and our small-but-mighty developer community uses it for all sorts of things. Whether you need an RSS, iCAL, or JSON feed of particular LiveWhale data or you want to build your own custom LiveWhale integration, we’ve got the tools and the skills to help.
Yes! We have secure, robust hosting fine-tuned for LiveWhale that we offer through Amazon Web Services. It’s highly-available with a 99.9% uptime guarantee, redundant, and includes nightly backups just in case. Let us worry about server updates, security packages, and the rest so you can focus on making your site awesome.
Yes! We’ll help you set up single-sign-on for LiveWhale so none of your users need to remember a separate password. You can also use this connection to do neat things like allow all faculty to edit their own profiles, or make certain pages/sections of your site available only to members of your college community.
Absolutely — and our small-but-mighty developer community uses it for all sorts of things. Whether you need an RSS, iCAL, or JSON feed of particular LiveWhale data or you want to build your own custom LiveWhale integration, we’ve got the tools and the skills to help.
A whole bunch of ways! To name a few… LiveWhale automatically generates robots.txt and sitemaps to feed search engines the latest content. Our page URLs (path/to/my/page) and dynamic content URLs (/live/news/123-title-of-news-story) are SEO-friendly out of the box. And, we auto-generate metatags (including Open Graph and JSON-LD tags) for all of your content automatically.
Yes — using the built-in Profiles tool you can easily add new types with custom fields for course listings, buildings on campus, special programs, or whatever else you need.
Our clients love using our software. Our business is making your (work) lives easier.
Adams State University
Adelphi University
Angelo State University
Arkansas State University
Barcelona School of Economics
Beloit College
Berea College
Brown University
Bucknell University
Carnegie Mellon University
Carondelet High School
Carthage College
Century College
Clarkson University
Clemson University
Colby College
College of the Atlantic
Colorado School of Mines
Connecticut College
Connecticut State Community Colleges
Cornell University College of Business
Dalhousie University
Eastern Florida State College
Emory & Henry College
Florida Institute of Technology
Georgetown University
Greenville Technical College
Grinnell College
Indiana University
Lewis & Clark College
Longwood University
Macalester College
Marymount Manhattan College
Menlo School
Middlesex College
Monmouth College
Mt Royal University
Mt. San Antonio College
New York Institute of Technology
New York University
NYU Abu Dhabi
NYU Shanghai
Oakland University
Portland Community College
Quinnipiac University
Radford University
Rice University
Saint Leo University
San Mateo Community College District
Santa Clara University
Santa Rosa Junior College
Seton Hall University
Simon Fraser University
Soka University of America
Southeastern Louisiana University
Southern Connecticut State University
Southwest Minnesota State University
Southwestern University
SUNY Brockport
SUNY Niagara
SUNY Purchase
Sweet Briar College
Syracuse Architecture
Tarleton State University
Temple University Beasley School of Law
Texas A&M University
Texas A&M, Corpus Christi
Trinity College
Tulsa Community College
University of Akron
University of Arkansas Medical Sciences
University of Calgary
University of California Berkeley
University of California Merced
University of Central Oklahoma
University of Chicago
University of Cincinnati
University of Connecticut
University of Florida
University of Houston
University of Louisiana, Lafayette
University of Louisiana, Monroe
University of Melbourne
University of Minnesota, Duluth
University of Minnesota, Twin Cities
University of Missouri
University of Missouri, Kansas City
University of Oklahoma
University of Pennsylvania Carey Law School
University of Pennsylvania Perelman School of Medicine
University of Pennsylvania School of Nursing
University of Southern Indiana
University of Texas at Austin, McCombs School of Business
University of Victoria
University of Wisconsin, Eau Claire
University of Wisconsin, Whitewater
Ursinus College
Vanderbilt University
Villanova University
Wesleyan University
Western Oregon University
York University, Schulich School of Business
We Have Your Back
We’re a responsive, efficient, enthusiastic team of creative problem solvers working from home offices in Oregon, California, New York, Nevada, Michigan, and Florida.
Isaac McGowan
Senior Developer
Isaac writes front-end code for the LiveWhale CMS, assists with other CMS implementations, and backs up our UI development team. He has developed and managed web applications since 1999, working on corporate teams as well as individually. Isaac lives in San Rafael with his wife and sons; his non-code interests include surfing, capoeira, and burritos.
Cindy Yueh
Web Developer
As a former tutor, Cindy has found a perfect combination of her love of teaching and web development in White Whale. She leads the theming and implementation process for new LiveWhale Calendar clients, and assists with testing and accessibility compliance. Outside of work, Cindy enjoys all sports, gaming, building mechanical keyboards, and going on long walks with her sister’s two dogs – Boba and Mango.
Tonya Langford Moyle
Vice President
On top of managing White Whale’s business affairs, Tonya works with clients on top-level branding and communications strategy – helping them get past organizational roadblocks and find ways to present web content to make sense to their multiple audiences. Raised in small-town Wisconsin, she headed east to attend Wellesley and then Brown, and then west to Portland, OR where she juggles work, kids, chickens, and a side-gig making napkins for her sister’s restaurant.
Katie Keaton
Project Manager
A compulsive list maker and professional organizer, it’s Katie’s job to shepherd projects from start to finish. She makes sure everything is on track, on budget, and everyone is happy. She holds a Bachelor’s from Alma College and a Master’s from Michigan State University. In her free time, you can find Katie with a camera around her neck or enjoying the outdoors with her dog.
Rachael Wilbur
Support Manager
Rachael has a wide range of knowledge and background experiences from working in the fine art, media, and higher education professions. She brings together all her strengths and translates them directly into helping with clients. Born and raised in the midwest, Rachael now calls the Blue Ridge Mountains her home—where she will make any excuse to go explore. She is a mother, photographer, avid recipe tester, and a former barista champion.
Jason Pontius
President
A pathological multitasker, Jason is involved in every aspect of the website development process – from collaborating with our senior designer on design work to overseeing the care and feeding of the LiveWhale CMS. Jason first began exploring interactive design in 1997 as a complement to his graduate study in linguistics at the University of Chicago (where he holds a master’s degree).
Karl Hinze
Director of Product
Karl is all about bringing people together to make beautiful things. Besides being a designer and programmer in his own right, Karl also has extensive experience in higher ed as a student, faculty, and staff member. Outside of White Whale, Karl is a musical theatre composer, where he continues to feed his love of collaboration, art, and storytelling.
Alex Romanovich
Technical Director
Alex has been indispensable to White Whale since its inception, becoming a permanent full-time employee in 2004 and taking the lead in the development of LiveWhale, our content management system. He is a graduate of NYU’s film and psychology programs, an active writer and photographer, and a student of metaphysics.